Thursday, March 17, 2016

LEGO Castle Jenga


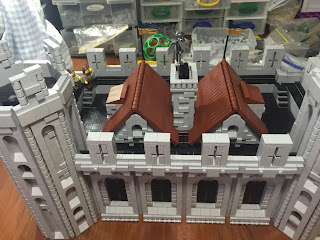
This is one of those 'I love it when a plan comes together' moments.  I'm often astounded at how much we can hold in out heads, it's incredible.  Up until this point what you see was only an idea, it's such an incredible rush when you actually make an idea real.  I'm sure you know what I'm talking about.  I know it's not like I'm building the Mona Lisa here, but it's great to be at this stage.

The lower level still needs an interior and lacks a rear wall.  Once again I'm facing parts shortages but at least I can concentrate on the interior until I sort out my plastic allowance for this week.

Also, the castle has it's own ghost now, Sir Spookington Mc Boo.


Sunday, March 13, 2016

Roofing Issues


Although not exactly what I originally planned I wasn't displeased at all with how the roof came out in the end.  At first I wanted to have the roof slide out as one single piece once the back wall was removed but it proved clunky and a little destructive.  You can see the horizontal slots in earlier pictures of the interior.

I even made the roof section a stud narrower but it didn't do much to alleviate the problem.  The stress was so great I ended up leaving it 1 stud short of the original width, which adds a small design aesthetic that only the creator can truly appreciate.

Intentionally crooked
The above shot really makes me want to work out some kind of lighting solution.  This model would really benefit from a model lighting kit or something.  I still need to work out a better solution for the flagpoles - I'll probably just use some flexitube in the end, a anything else makes them look too segmented and unnatural.


I've already started on the next level which I plan to include a grand balcony, a dinning hall and maybe a medieval loo.  Let's hope I can get at least two of those features in, I already foresee part shortages and even have a Bricklink tab open as we speak.  If only the Australian Dollar was worth anything anymore ... why am I always building when the local economy is going to the dogs?

Thursday, March 10, 2016

Progress!


There's finally something worth blogging about.  It's been a difficult couple of weeks.  Work and home life have been a little busier than usual and it's been hard to find the time to build and post.  I've had a couple of part shortages too, most especially 1 x 1 modified bricks with a stud on one side and headlight bricks.  I have tried to keep it down to one order a week so far, and I must admit, I feel guilty typing that out.  But it's mostly been for little things and costs have been relatively low.  And it's not like I didn't realise what I was getting myself into when I fist started.

This is a view from the rear.  The roofing is complete but I'll cover that in more detail in a future post.  The entire rear wall of this section slides up and out to reveal the interior.


I'm still not happy with the flag poles and am likely to change them in the future.  The two roof sections look slightly out of place here but works quite well when the interior is not exposed.


The wall section slides into slots in the rear walls.  It was a lot clunkier than I originally anticipated do to the inherent misalignments in the bricks but actually improved over time and use.  It would be great to get some lighting working in this model, but I am really unsure which method would work best between the 80's lighting kit, yellow, battery powered light bricks, or a custom solution.  If anyone has any suggestions let me know in the comments.

Monday, February 15, 2016

WIP update: Interiors 'Complete' for Upper Level


After a long and frustratingly UN-LEGO week it was great to get back to my project.  I had started on my interior earlier but was waiting on a bricklink order to arrive so I could complete it.  I tinkered a bit here and there and encountered some issues with the roofing - I'll cover that in a later post - and went over some of the interiors I had built in the past to see if I could inspire myself.


Looking back at some of my older castle themed builds I noticed the interiors were often added as an afterthought, and always added at the very end.  I remember there was often a sense of rush when I was adding these details - the exterior was done and I was keen to get it posted, mostly because I believed my building defined my participation within the community.  If I wasn't building and posting then I wasn't part of the game.  And let's face it, few people will follow the links to the more detailed pictures, it's very much about that first image.  My last few builds - the medieval village - has no interiors at all.


Well, no rushing this time round.  I have limited time as it is so I was determined to take it easy and make this right.  I have tried to put as much effort into these two rooms as I would a creation that was solely an interior diorama without an exterior.  Originally I wasn't to make the scene into a mini vignette just for this shoot but I was so creatively drained I couldn't think of a thing!  Of course once the shoot was finished multiple comic scenarios occurred to me but by then it was too late. 


Fighting that creativity drain can be hard.  I currently work as a music and guitar teacher so I am playing music and flexing my creative muscle all the time.  Sometimes my brain muscle is just too exhausted to think beyond my previous planning.  It's weird to explain, mostly the inspiration just flows, but in times like these I feel like my head is empty.  It's like you can hear the wind whistling through my ears.  Stupid wind's too loud, it won't let me think!  I think next time I'll put it off for twenty four hours and approach it with a fresh head.

Still it's not like the interior didn't work out!  It's just not as funny as it could have been - which was totally hilarious I assure you.  Maybe next time...

Sunday, February 14, 2016

Inspiration, imitation, or how I stole Luis' chair


The more you involve yourself in the LEGO community, the more you're going to be exposed to everyone's work.  This is ultimately a good thing as it allows you to explore so many different ideas and varying approaches to the same problem.  Your fellow builders can be an endless source of inspiration.  Don't be afraid to borrow ideas from your contacts, just don't forget to give them credit either.  I mean, that's why we share our creations right? To share ideas and inspire overs?  Well, that and obviously to feed our fragile egos.  Even when a picture of mine is blatantly stolen I can't help but to take it as some kind of misguided compliment.

While building my interior I was lucky enough to stumble on this vignette by talented 0937 Lug member Luis Baixinho and instantly knew I had to make something similar.  Luis' use of classic robot arms and rods inspired me to come up with my own version.  When I find something that really inspires me like this I like to try to make my own without looking at their picture as a reference.  This forces me to come up with my own ideas and solutions while still retaining the genius of the original.  That being said, mine didn't prove to be too different from Luis' in the end so full credit to him.  I did manage to come up with a nifty little bench by myself though.  I think it's cute!
Here's the bench from above with the top hinged up
to show it's inner workings

Tuesday, February 9, 2016

On my way!

There's no going back now!
The top level walls are now completed!  It's been a while since my last update, but only because I've been spending my free time building.  There's still a bit more to do yet on this section, but at this point I have a pretty clear idea what to expect with the next level and how the keep will look as a whole.  There's really a lot of challenges to overcome here and a lot of important details to work out.  Not least of all is the shape.  I chose octagonal towers, this causes a slight offset so that the corner is not perfectly square.  It's still quite workable but has been annoying to work around.


The battlements are such an important feature of a castle, it's undoubtedly one of the defining architectural features of the genre.  I tried to add as much detail as possible, utalising SNOT tiling and offset stonework on the crenels to frame the merlons.  Confusing?  Merlons are basically the part of the battlements that are higher than the wall which provide cover for defenders.  The crenel, or embrasure, is the open space between the merlons.  Oh and crenallation is just another word for battlements.  Most of the confusion stems from the fact that there are two words for most castle features, an Old English word and a Norman word.

The arrowslits look awesome, but aren't actually my design.  I pretty much copied them from brickshelf user RabbitSpook, Jacob C on Classic Castle.


To avoid "Big Gray Wall" issues I used tiles to make the brickwork look a little more interesting, especially as I have decided to stay away from mottling.  The battlements on the tower tops took the most time, I must have rebuilt them at least four times trying to get the right scale, shape, and feel.  In the end I think they look a little thin but I'm not unhappy with them.  I may yet rebuilt these again to give them some more depth.

As with many of my creations I used 1 x 1 round bricks to round out the corners on the towers.  I have used this technique so many times but it is easily the best way to finsh the corners on any tower that has more than four and works perfectly with an octogon. 


As I said before the octagonal turrets posed a few challenges, not least of which was the flexibility of the hinges which caused the entire structure to suffer from structurally.  Because of the inprecise nature of the shape I used this brace constructed from technic axels to help keep the tower sturdy.  It was a relatively late revalation as I had simply used bricks to brace my towers before.  I may yet add another to the bottom level of this section at a different angle to reinforce it further.  I'll definately use two in the next level.

There's so much to do next; a sliding panel, an interior for this level, or even starting on the next level.  This is a great stage to be in with a build like this, there is so much to do it's hard to get bored.  If one thing holds me up due to construction difficulties or cost I can simply move to a differnet task until the other resilves itself.

Wednesday, February 3, 2016

Cover Up!

The shame!
Dust.  The natural enemy of LEGO. 

The bigger your creation is, the longer it will take to build, and the longer it's going to be exposed to dust.  Anyone who has photographed LEGO under a bright light will know that there is nothing more distracting than that curiously reflective, tiny hair that has somehow sneaked into shot, smack on the nose of your build.  With a project this large it won't take long before you're wiping your finger across the top of your carefully constructed crenelations to expose a clean streak amidst the wasteland of dust.  Dust that you didn't even know was there a second ago.  Grey and white brick hide dust the best, that is until you open your pics in photoshop and you realise you have to do the whole shoot all over again. 

To try to reduce the ravages of dust it's a good idea to find a pillow case, or a tea towel, and eventually even a bed sheet to cover your creation while you're not building.  I also keep a number of unused easel brushes to help keep my build dust free.  Small brushes are great as you can maneuver them into difficult places with a high level of accuracy. 


Other builders I have spoken to over the years have suggested pressurized cans of air or mini squeeze dusters, especially for really dusty models.


Whichever you choose I bet you never envisioned house cleaning when you first took up this hobby.